Media equipment for film, meetings, conferences and other things I use at work
 Micke Kring
·
·
9 min read
Micke Kring
·
·
9 min read
Lately there have been quite a few questions about everything from which cameras and software I use to what green screen color I have on the wall. In the times we live in now it’s perhaps not so surprising when digital versions of meetings, events, information and conferences have exploded — and will probably continue to do so even after the pandemic. Digital video and audio have been big for a long time, but even more so now. In this post I thought I’d go through what I use on an almost daily basis.
The first thing I have to say is that I’m by no means an expert on cameras, lighting and that kind of equipment. I read up and buy what seems to work. So if you ask follow-up questions about which lens I like best, I don’t have an answer. :)
It’s also important to keep in mind that as a school we’re not a media agency. The emphasis is on being able to quickly produce things that look good in as short a time as possible without it ideally taking any time at all or costing anything.
 Principal Kalle - all-staff conference in Zoom at Årstaskolan[/caption]
Contents
- Cameras
- HDMI > Computer
- Lighting
- Audio
- Green Screen
- Screen recording
- Software
(1) Cameras
2 Sony FDR-AX700s + XLR Shotgun Mic Kit

Easy-to-use and stable 4K camera, although I always run at a max of 1080p for both recording and streaming video. Clean HDMI out, which means I can use it to stream video and as a webcam. With the shotgun mic accessory and XLR inputs I can use pretty much any microphone. Mostly used to film various productions and to stream things like staff meetings, all-staff conferences, training sessions and other public or Zoom/Teams-style events. It’s also worth mentioning the stability of these cameras — I’ve streamed for hours with them without problems. Read more on Sony’s website
FaceTime camera iPhone / Mac
In smaller meetings I of course use the built-in camera on either my iPhone or, most often, my MacBooks. I also sometimes use the iPhone for filming as well.
(2) HDMI > Computer
To use external cameras like my Sony cameras, you need something that takes the HDMI signal from the camera and converts it to USB so you can get it into your computer. But this doesn’t just apply to cameras — anything with HDMI out will work. For example, when I made a bunch of training videos about Windows I ran HDMI out from my Windows laptop and recorded it on my MacBook.
2 Magewell USB Capture HDMI Plus
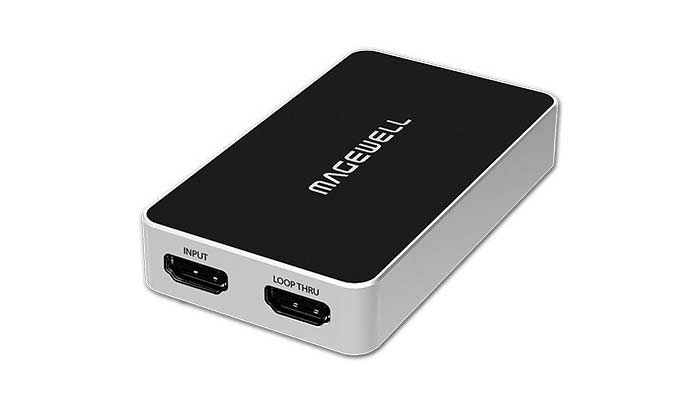
I used to use the Blackmagic Ultrastudio Mini Recorder and they worked very well with their cameras. Unfortunately they’re pretty old now and don’t work well anymore, so I switched to Magewell. These also work very stably and smoothly. I haven’t had any problems with them and they’ve handled everything I’ve thrown at them. Read more on Magewell’s website
Blackmagic ATEM Mini
To take things a step further and get even more inputs — since I’d like to have both cameras and a laptop connected for a broadcast — I ordered an ATEM Mini from Blackmagic — it gives me 4 HDMI inputs for the price of a Magewell. I’ll review it after I’ve tested it for a while, but there are plenty of reviews on YouTube.

(3) Lighting
Lighting is super important for photo and video. The more light, the less noise. Unfortunately I don’t really know what we have. We’ve accumulated a lot of equipment over the years and we have several different models of lamps that were bought by a former colleague who really knew his stuff. Make sure you have good lighting on the face of whoever you’re filming so the person is visible.
Linkstar

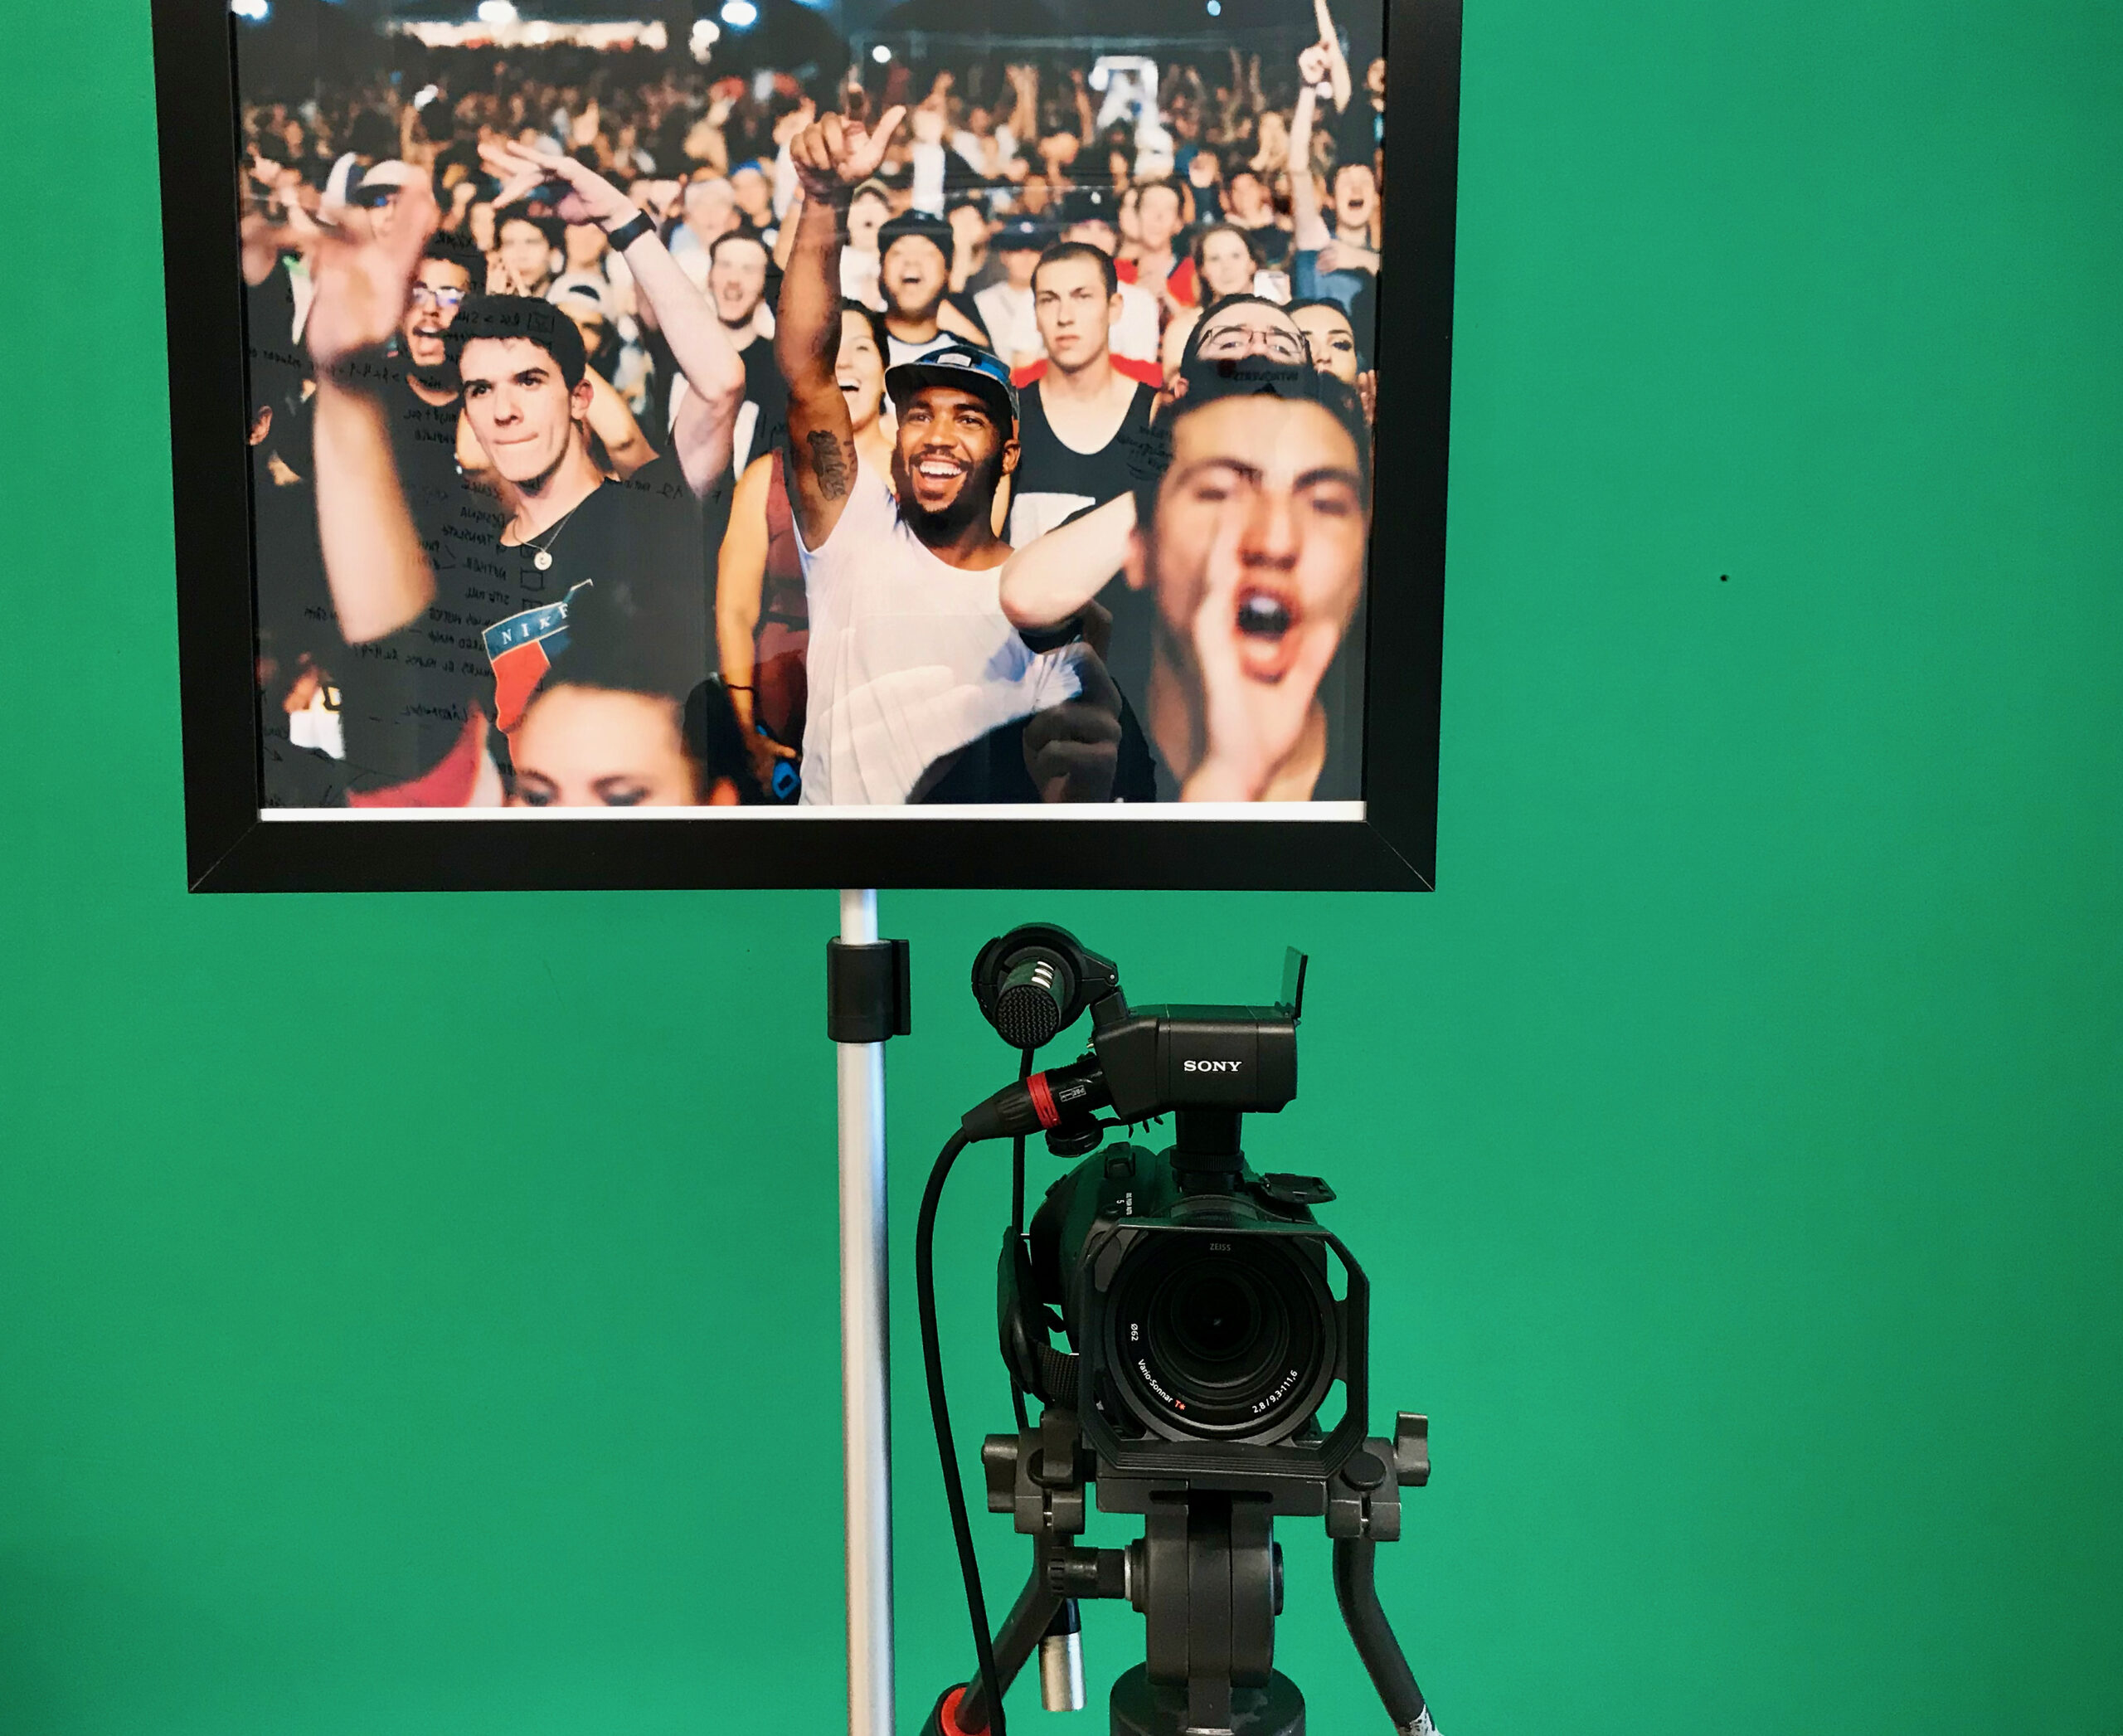
The lamps I use most are LED lights like the ones in the picture above, with softboxes and adjustable brightness from Linkstar. NOTE! Don’t forget to print out your audience image so you don’t have to stare into an empty camera! (See above the camera in the picture)
 Behind the fabric there’s a bunch of LED lights.
Clas Ohlson

Don’t forget good lighting when you’re in video meetings at home or in the office too! Here I angle a desk lamp into my face. This model is probably from Clas Ohlson and costs only a few tens of kronor.
(4) Audio
Wireless - Shure BLX 24E

We have a fair amount of wireless systems at the school and I’ve nicked two Shure BLX 24E units with wireless lavalier mics. These are pretty old models and are probably no longer sold, but they do the job and work very well. I choose wireless in most cases because it’s the most convenient for the speaker. It won’t give you the absolute best result, but it’s good enough. For people who aren’t used to having a microphone on their face or who don’t speak loudly enough for a shotgun mic, a lavalier is psychologically good — people barely notice it. The wireless receivers are connected via XLR straight into one of the cameras, so you get the audio via HDMI.
Audio-Technica

When I record instructional videos, do voiceovers, podcasts or similar and want better audio I of course choose a large-diaphragm condenser microphone. Personally I think the AT2020s — for just under a thousand kronor — do a good job for the money. Just make sure you have a pop filter.
Apple AirPods
Don’t forget the best microphone you have — the one you always carry with you! To be honest I use my iPhone headset in way too many productions. For quick instructional videos it’s fast to plug in and gives sufficiently good audio. The same goes for online meetings. Do you know how many meetings I’ve sat in where some people have massive gaming headsets and it still sounds awful? What tends to work best is when people use their regular phone headsets.
(5) Green Screen
In the video above you can see part of the setup I’ve made permanent in my office for various types of meetings, lectures and trainings. On the screen I can choose to show meeting participants, my own Keynote or other content.
 Here’s it rigged for training…
Rosco Video Paint
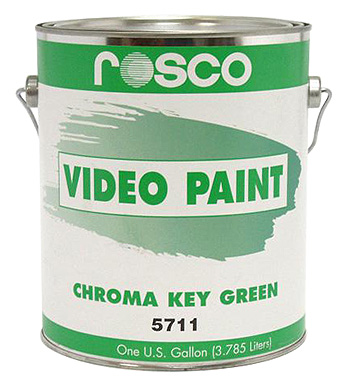
The color I’ve painted walls with, both in our Makerspace and now part of my office, is Rosco’s Chroma Key Green. Ridiculously expensive, but really good, even and opaque. I do think you could probably manage to make something really cheap yourself. The important thing is that the color is as even and clean as possible so your computer knows what to “replace” the green with.

My colleague Jonas gives a lecture for all teachers in my office via Zoom[/caption] What’s important with a green screen to get a good result is that the green in the background is as even as possible. Shadows are in practice a darker green and in the worst case black. So make sure to step at least one step away from the wall. This is also why a painted wall is good instead of a piece of fabric, which easily becomes creased and therefore full of shadows. Fabric does work though, which I sometimes use. I’ve bought cheap 3 x 1.5 meter ones for a few hundred kronor. If you’re going to have these on the wall, make sure to stretch them tight. Put lighting on the green screen if you can to get rid of shadows.

In the image above you can see the recording of this year’s Lucia in our Makerspace. To be able to use the students’ feet I laid a green screen fabric on the floor.
(6) Screen recording
When it comes to recording the screen to make instructional videos or teaching material, almost everything is built into my Apple gear, software-wise. As I wrote earlier I can also bring in a screen from a Windows computer via HDMI to my Mac and thus cover that area as well. Under software I list all the software I use.
(7) Software
Below I list the software I most often use. Unfortunately it’s heavily MacOS-focused, but of course there are Windows alternatives for everything.
QuickTime + Screen Recording | MacOS - iOS | Screen recording - Recording other sources
QuickTime is built into MacOS and to record my screen or other sources I just start QuickTime and record. If I need to record what’s happening on my iPad or iPhone I can either record directly on the device, or connect them to my Mac and record the screen via QuickTime.
Final Cut Pro | MacOS | Video editing | Link
Final Cut is the program I use for editing video. This is for pre-recorded material.
iMovie | MacOS - iOS | Video editing
For quick edits of small things on my phone I sometimes use Moviemaker to trim and cut.
Wirecast | MacOS - Windows | Live streaming video | Link
For slightly larger productions where I want multiple cameras, overlays and other things I use Wirecast to stream to YouTube, Facebook, LinkedIn and Twitter. It’s easy to work with and has been a real workhorse for many years. You can also use a video production built in Wirecast as a source in Zoom or Teams.
Ecamm Live | MacOS | Live streaming video | Link
Another very nice alternative to Wirecast is Ecamm Live. Here you can also build live productions and stream to the major services.
Screenflow | MacOS | Create instructional videos and teaching material | Link
To quickly make instructional material I use Screenflow almost exclusively. Adding arrows, shapes, text, zooming, cutting and other edits is super easy here.
Logic Pro X | MacOS | Music production | Link
As a former musician Logic is what I turn to when audio production is needed, or to record podcasts and similar. However, I’d like to make a case for GarageBand which has become very capable these days. GarageBand | MacOS - iOS | Music production GarageBand is a scaled-down version of Logic that contains pretty much everything you need for your audio productions.
Questions?
If you have questions you’re welcome to ask them here or on any social media.